Soft, smooth and beautiful hands leave a lasting impression of your personality. Beautiful well-kept hands are an asset. A weekly manicure plays a vital role in achieving this. It is not necessary to go to a beauty parlor to get a manicure. It can be done at home, while relaxing, watching television or in your spare time.
For a weekly manicure at home, you will require – nail cutter, nail-polish, cotton wool, cuticle cream, orange sticks, pumice stone, emery board, soft nailbrush, hand cream, liquid soap or shampoo and a bowl of lukewarm water.
* Soak cotton wool in the nail polish remover and wipe off the old nail polish.
* Now use a nail cutter to shape your nails,
if required.For a weekly manicure at home, you will require – nail cutter, nail-polish, cotton wool, cuticle cream, orange sticks, pumice stone, emery board, soft nailbrush, hand cream, liquid soap or shampoo and a bowl of lukewarm water.
Just follow these simple steps or a manicure:
* Soak cotton wool in the nail polish remover and wipe off the old nail polish.
* Now use a nail cutter to shape your nails,

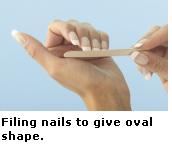
* File your nails with an emery board.
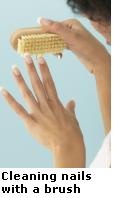
* Add a few drops of liquid soap or shampoo to the bowl of warm water, clean them by rubbing gently with a pumice stone. Similarly, use the nailbrush on the nails to softly clean them.
* Take your hands out of the water and pat-dry with a soft towel. Apply cuticle cream to your nails.
Painting nails
* Next clean around your nails by using orange stick moistened with cuticle cream. Gently push back the cuticles and remove the dead skin.
* Wash off the cream from your hands by dipping them in the warm water again. Dry your hands with a towel.
* Now massage your hands with a
 hand-cream for 5-7 minutes. Remove the extra cream with a wet towel.
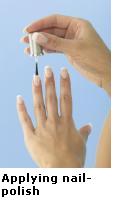
* Paint the nails with nail polish of the desired color. Apply the base coat, let it dry and then put the second coat.
See also: Hand and Nail Care/ Pamper your feet/ Pedicure at home-easy steps / Baths / Body odor/ 5 golden rules of skin care/ Lemon as a beauty aid / Milk for health & beauty


. first remove your old polish with a cotton ball. and all the corners with a cotton swab.
ReplyDeletesok your hands in warm water 4 5 min.
while your hands are wet use a pumice stone to get rid of dry skin
put on some moisturizer
push back your cuticles and file your nails into a pretty shape
put on a clear base coat and let dry for 3 min.
then put on two coats of colors letting dry in between each coat
when nails are totally dry add a clear topcoat again
clean up any mistakes with a cotton swab
:) :) :)
You need the following items:
ReplyDeleteCuticle softener (I like sally hansen's)
Orange wood sticks (Don't use metal like the salon does because this can damage your nail bed)
Cuticle trimmer (I like the tweezerman brand from Sally Beauty Supply and it costs about 20 dollars. Make sure the blades are the wider kind, not the short kind).
Nail Buffer and Super fine file for edges.
Oil
Remove the old polish. Moisten a cotton ball with nail polish remover. The type of polish remover depends on your personal preference. Press the cotton ball over the nail for a few seconds to soften the old polish. Wipe gently with the cotton ball on the nail starting at the base of the nail to the tip. This keeps old polish from smearing into the cuticle
ReplyDeleteFirst file and shape your nails. Second = wash your hands. Then paint the tips, on one hand, with a good white opaque nail polish. The put some nail polish remover in the cap and get a small brush that has short, stiff bristles but not long. Then, upside down, dip the brush into the remover and brush away the "bad" part of the white, while you are shaping it to the desired size of tip you want. Continue the same on all you nails and then polish one or two coats of a sheer color like pink or beige for french manicures.
ReplyDeleteAvoid the skin. Polish on skin will peel off as soon as it’s dry. It will also pull off and chip any polish on the nail that it’s attached to. Take an orange wood stick with a small amount of cotton wrapped around the end and clean up the edges with polish remover before it dries.
ReplyDeleteBe consistent, patient and realistic! Manicures do not last as long as pedicures. The beach will destroy the polish on your toes. Yes it does take as much as two hours for polish to dry enough to wear shoes. Let it be fun! Enjoy those bright colors and soft feet, but remember that everyday life also leaves marks. If estheticians could control physics and chemistry, believe me they would.
ReplyDeleteBefore applying nail polish, make sure that you are satisfied with the shape and length of your fingernails. Begin by applying the base coat for the nail in smooth lines from the base of the nail outward. Some have suggested that laying a horizontal band of polish along the tip of the nail and then applying the polish from the base outward can help prolong chip-free wear. The technique is slightly more difficult to perfect, but may be worth attempting if your nail polish chips frequently. Apply the base coat on all nails (it is usually easiest to start by applying polish to the dominant hand using the non-dominant hand and then switching); let the base dry. Apply two coats of the chosen color on each nail, letting the coats dry fully. Apply the top coat last and let the nails dry again.
ReplyDeleteTo save money on manicures, don't get them so often. Instead, use a nail buffer to shine nails between manicures
ReplyDeleteFile trouble spots. This keeps splits or jagged edges from catching and tearing, which can make the problem worse . The best tool for the job: Tweezerman Supersoft Nail File
ReplyDeleteOne way to remove old nail polish is to apply a new coat of polish. Buy clear polish and put a thick coat on each nail one at a time. After applying the coat, wipe immediately. Do not let it dry. This should remove the old nail polish off the nail as well. It's quick, easy and cheap, since a bottle of clear nail polish costs around 99 cents
ReplyDeleteThe benefits of manicure are:the feel and look of the hands and fingers improves. It cleans, strengthens, shapes and also dresses up the nails. The massage that accompanies a manicure helps in the improvement of skin health as it increases the circulation of blood.
ReplyDeleteManicure improvises the health and texture of the hands and the fingernails. It helps in the prevention of hang-nails.
ReplyDelete